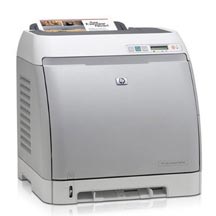
We bought a nice color laser printer in late 2007. It was an HP Color LaserJet 2605DN. Worked great with the Mac, nice set of features, good color. Made some funny self-cleaning noises once a day but was otherwise quiet and unobtrusive. We didn't use it heavily, because the ink is expensive: but it served its purpose for soft-proofing of print work, and the duplexing feature was nice for two-sided printing.
In early 2010, the printer's output got pretty bad, seemingly rather suddenly. Although the ink cartridges were not nearly used up, red printed very faintly, and so everything looked strange.
I looked online in the labyrinthine HP supprt website. The printer was out of warranty and no longer supported, so there wasn't a lot of information. Mail to HP support was not answered. In the customer-to-customer support forum, there was information about my problem. It's a design flaw in the Canon engine used in some HP color laser printers: dust accumulates on the mirrors deep inside the printer and causes colors to come out poorly. Because the magenta cartridge's mirror is on the bottom this model, it gets the most dust.
If you look up HP 2605 printers in Amazon, customer comments on this model confirm that fading reds are a problem, and that HP has no solution.
The HP customer forum note provided a link to a PDF from "Don Thompson's Service Seminars" which explained how to clean the printer. The procedure was long and complicated: take the sides and back off the printer, unplug and remove a lot of wiring and a controller board, remove the laser assembly, and poke at it with a cotton swab and a can of compressed air, then put it all back together. (Thompson's note says that the HP 2600, 1600, 3000, 3500, 3600 3700, 3800, and 4700 series printers have similar problems.)
I did the whole process. The hardest part was the first screw, which I could barely get to turn, and the second hardest was getting the plastic sides off the machine. The rest was just finicky and tedious. Took me 4 hours -- the first time. I didn't do things in the right order when reassembling the machine and had to redo some steps. I finally got the whole machine back together, crossed my fingers, and plugged it in. Hurrah, it started up, and printed a config page. We printed a document that had come out badly, and the reds were OK... but colors were too red. Flesh tones were an obnoxious pink.
I re-did the whole process. Took me 3 hours the second time, and I made fewer mistakes. This time I cleaned the mirrors and lenses more carefully, paying attention to the mirrors and lenses for yellow and blue as well. When I reassembled the machine and tried it again, colors were good.
(Postscript: Don Thompson has gone into another line of work, and is no longer doing laser printer repair. I wish him well, couldn't have done it without him. I saved the PDF in case his site goes away.)
Postscript: had to do the procedure it again in July 2011. There is one part of Don Thompson's instructions that can be improved. On page one, when removing the right side cover, you'll find this is very difficult: but if you look inside the printer and release a plastic hook, it comes right off. In addition, if you do this repair rarely, it might be a good idea to label each wire you unplug so that you can plug it back in again with confidence. I forgot some of the connections when reassembling, and got various error messages when I tried the printer, and had to re-do the process. 6 hours.
In six months the reds had faded again. I threw the printer away and bought one from another manufacturer.
I found another note, by Andrew Reeves-Hall, that has ![]() step-by-step instructions, with pictures. He credits Don Thompson too.
step-by-step instructions, with pictures. He credits Don Thompson too.

